 blog
How to Choose the Best Chalk Paint Brushes for Beginners
Last Updated: October 30, 2026
Quick Summary
The best chalk paint brushes for beginners are natural bristle brushes, which hold thick paint and release it gradually for the soft, aged finish chalk paint is known for. Start with a natural bristle brush as your primary tool, then add a synthetic brush for thin water-based products and touch-ups.
- Round brushes hold the most paint and cover large flat surfaces in fewer strokes.
- Work new natural bristle brushes against your palm to avoid stray hairs in wet paint.
- Dip only the bottom third of the bristles and tap off excess against the rim.
- Keep a dedicated wax brush separate, because wax left in bristles ruins a brush for paint.
- Rinse within an hour of finishing and lay brushes flat to dry, never bristles-up.
Table of Contents
- What Makes a Brush Work Well With Chalk Paint
- Chalk Paint Brush Shapes: Round, Oval, Flat, and Angled Explained
- Natural vs. Synthetic Bristles: Which Bristle Type Belongs in Your Kit
- Matching Brush Size and Width to Your Project
- The Best Brush for Chalk Paint Wax and Finishing Coats
- A Simple Painting Technique for a Smooth, Streak-Free Finish
- How to Clean Chalk Paint Brushes So They Last for Years
- Build Your Beginner Brush Set at JunQtique
- Frequently Asked Questions
What Makes a Brush Work Well With Chalk Paint
The best chalk paint brushes for beginners share one trait: they hold paint without shedding it. Chalk-style paint is thicker than standard wall paint, so a brush needs flexible bristles that release product evenly instead of dumping it in one spot.
First-time refinishers often worry about ending up with a streaky mess. A brush that matches the paint helps prevent that. Chalk paint grips a surface fast, which means every stroke shows. A brush with flagged, tapered tips lays product down smoothly and lets you work the paint into corners without scrubbing.
Three things separate a brush that works from one that fights you:
- Bristle flex so the brush bends with the surface, not against it
- Dense fill so paint loads once and covers a wider area
- A secure ferrule so bristles stay put through repeated washing
The Ultimate Guide: Choosing the Best Chalk Paint Brush notes that natural bristle brushes are the standard for the textured, vintage finish chalk paint is known for. That texture is the point. A brush that lays paint too flat strips away the character you're after.
Chalk Paint Brush Shapes: Round, Oval, Flat, and Angled Explained
Brush shape decides where paint lands and how much control you have. Round brushes suit broad sweeps, oval brushes blend curves, flat brushes cover panels, and angled brushes reach into edges and trim.
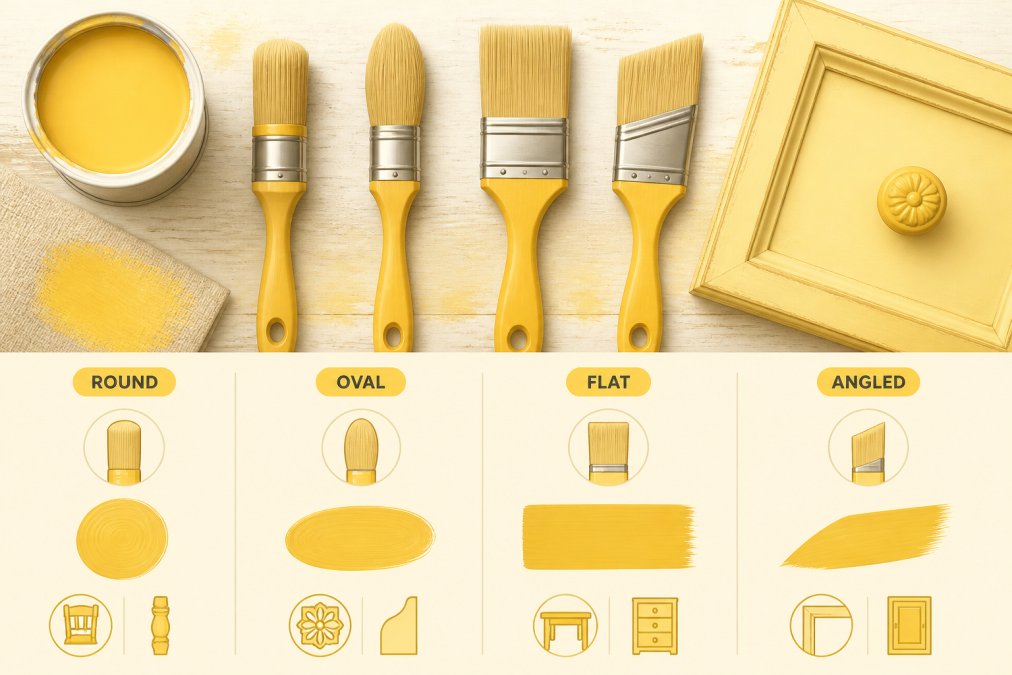
Here's how each shape earns its place in your kit:
- Round: Holds the most paint and covers large flat surfaces in fewer strokes. Ideal for tabletops and dresser sides.
- Oval: A middle ground. The rounded edge blends into curves and turned legs without leaving hard lines.
- Flat: Even coverage on drawer fronts and cabinet doors. The squared edge gets you into corners cleanly.
- Angled: Cuts in along trim, molding, and recessed panels. The slanted tip gives you stroke control where a flat brush overshoots.
If you want to see the round shape in action on bigger pieces, our large round chalk paint brush is built for exactly that kind of coverage. For detail work and tighter edges, the small flat chalk paint brush keeps your strokes precise.
Natural vs. Synthetic Bristles: Which Bristle Type Belongs in Your Kit
Natural bristles win for texture; synthetic bristles win for durability and cleanup. For most beginners, the right kit is a natural bristle brush as the primary tool and one synthetic option for thinner water-based products and touch-ups.
Here is the trade-off in plain terms:
| Factor | Natural (boar/hog) | Synthetic |
|---|---|---|
| Paint pickup | High, split ends hold thick paint | Moderate, releases faster |
| Finish character | Soft, aged, subtle brush marks | Smoother, more uniform |
| Best for | Chalk-style paint on furniture | Water-based touch-ups, thin products |
| Break-in | Sheds a few hairs when new | Minimal shedding |
| Cleanup | Needs prompt rinsing | Rinses faster |
| Lifespan | Years with care | Years with care |
Natural bristles, usually boar or hog hair, have split ends, often called flagged tips, that grab thick paint and release it gradually as you stroke. The Ultimate Guide: Choosing the Best Chalk Paint Brush treats natural bristle as the standard for exactly this reason.
Synthetic bristles resist water and clean up faster. They are a practical choice if you are working with thinner water-based products or want a brush you can rinse and reuse without much fuss. The trade-off is a flatter, more uniform finish, less of the vintage character natural bristle delivers.
Natural bristles can shed a few hairs when new. Working them against your palm before the first coat helps avoid stray bristles landing in wet paint.
For most beginners, the decision comes down to finish: natural for texture and character, synthetic for speed and cleanup. Buy natural first, and you will not fight the paint.
Matching Brush Size and Width to Your Project
Brush width should match the size of the surface in front of you. A brush too wide for a small drawer wastes paint and smears edges; one too narrow on a big panel leaves lap marks where strokes overlap.
Use this as your starting guide:
| Project | Brush Size | Why It Works |
|---|---|---|
| Dressers, tabletops, sideboards | Large round | Covers wide flat surfaces in fewer passes |
| Cabinet doors, drawer fronts | Medium round or flat | Balanced control on mid-size panels |
| Chair legs, spindles, trim | Small round or angled | Reaches curves and tight spots |
| Stenciling and crafts | Small flat | Precise placement, minimal overspill |
| Wax and finishing coats | Dedicated wax brush | Even, thin distribution |
For a versatile middle option, our medium round chalk paint brush handles most furniture makeovers without switching tools. If your project is mostly small details, the small round chalk paint brush gives you the control a big brush can't.
When working on a big piece, two medium brushes can be easier to manage than one very large brush.
The Best Brush for Chalk Paint Wax and Finishing Coats
A dedicated wax brush is the right tool for finishing coats. Wax needs to be pushed into the paint surface in thin, even layers, and a stiff wax brush does that far better than a paint brush loaded with color.
Using your paint brush for wax is a common mistake. The bristles hold too much product, and you end up with a gummy, uneven coat that never fully cures.
A proper wax brush has short, dense bristles that work wax into the grain and buff it back out. Apply in small circles, keep the layer thin, and wipe away excess with a clean cloth before it sets. Thin coats build a soft sheen you can control; thick coats turn sticky.
Keep one wax brush separate from your paint brushes. Once a brush has wax in it, it never quite works the same on paint again.
A Simple Painting Technique for a Smooth, Streak-Free Finish
Streaks come from too much paint and too few strokes. Load the brush lightly, apply in one direction, and resist the urge to go back over wet paint.
Follow these steps for a clean finish:
- Dip only the bottom third of the bristles into the paint
- Tap off excess against the rim instead of wiping it on the edge
- Apply in long, even strokes following the grain
- Reload before the brush starts to drag
- Let the first coat dry fully before the second
Watch out: going back over a half-dry area is the fastest way to pull up paint and leave a patchy surface. If a spot needs more coverage, wait for the coat to dry and add another thin layer.
Stroke control matters more than speed. Slow, deliberate passes with a well-loaded brush produce the smooth finish you see in finished makeovers.
How to Clean Chalk Paint Brushes So They Last for Years
Clean chalk paint brushes with warm water and mild soap before the paint dries. Water-based chalk paint rinses out more easily when you act promptly. The part most beginners get wrong is not the washing, it is the drying and the paint-to-wax transition.
The cleaning routine that works:
- Rinse under warm running water, working the bristles with your fingers from the ferrule outward
- Add a drop of mild soap and work it through the base of the bristles where paint collects
- Rinse until the water runs clear, cloudy rinse water means paint is still in the brush
- Reshape the bristles with your fingers and lay the brush flat to dry
Never stand a wet brush on its bristles. Water seeps into the ferrule and loosens the glue that holds everything together. Lay it flat or hang it bristles-down. Drying bristles-up in a jar is the most common way beginners ruin an otherwise good brush.
The paint-to-wax transition
Wax left in the bristles hardens and ruins the brush for future paint coats. This is why a dedicated wax brush matters: once a brush has wax in it, it never quite works the same on paint again. If you must reuse a brush between paint and wax, clean it thoroughly with warm water and soap, work out the residue at the base of the bristles, and let it dry completely before switching products. A brush that still feels tacky or stiff at the base is not clean enough for paint.
Drying and storage
- Dry flat or bristles-down; never bristles-up in a jar
- Store dry brushes bristles-up in a cup or lying flat in a drawer, never crammed bristle-first into a toolbox
- Keep wax brushes separate from paint brushes, ideally labeled, so you never cross-contaminate
- Reshape bristles while damp so they dry in their original form
Cleaning a brush promptly, drying it flat, and storing it with its shape intact helps it stay in good condition between projects.
Build Your Beginner Brush Set at JunQtique
You don't need a dozen brushes to start. A round, a flat, an angled, and a wax brush cover nearly every beginner project, and buying them as a set saves you from guessing.
JunQtique offers Chalk Paint supplies alongside vintage furniture and home decor. For a broader look at what a first project needs, see our beginner furniture refinishing supply list for 2026.
Start with the shapes that match your furniture, add a wax brush for the finish, and clean them properly between projects. That's the whole formula.
Frequently Asked Questions
Should beginners use a round or flat brush for chalk paint?
A round brush is the easier starting point for most beginners. Its domed head holds paint well and works it into the surface with light pressure, which helps hide brush marks on furniture. Flat brushes cover large flat surfaces faster but leave more visible edges if your stroke control is still developing. Many beginners keep both: round for body panels and flat for tabletops or wide drawer fronts.
Can the same brush be used for chalk paint and wax?
It can, but a dedicated brush for chalk paint wax gives better results. Wax is thicker and tackier, and it pushes bristles apart over time. A separate wax brush, ideally with dense natural bristles, lets you press wax into the surface without dragging paint residue into the finish. If you do share one brush, clean it thoroughly between products and dry it fully before switching.
How do you clean chalk paint brushes after use?
Rinse the bristles in warm water while the paint is still wet, working the water from the base of the bristles to the tips. A small amount of mild soap helps lift residue from natural bristles. Rinse until the water runs clear, shake out excess, and reshape the head by hand. Dry the brush flat or bristles-down, never standing on its tip, and store it in a dust-free space.
Do I need expensive brushes to get a professional finish?
Not necessarily. Bristle type and shape matter more than price. A well-made natural bristle brush in the right size for your project does most of the work. Beginner sets that bundle a medium round brush, a flat brush, and a small detail brush cover furniture, cabinets, and home decor projects without buying tools you will not use.
Ready to stop guessing and start painting? Get started with JunQtique and build a brush set that gives you the smooth, professional finish you've been picturing for your furniture.